The Auto Rejection feature is designed to address the issue of unconfirmed open proposal requests by automatically canceling aging requests that exceed a specified number of days. This helps eliminate the need for manual cancellation of requests that will never be confirmed. It is important to note that while the feature is available to all clients, only administrative users have the ability to configure and enable it.
See Automatic Aged Proposal Request Rejection
STEP 1: ENABLE THE FEATURE
To enable the Auto Rejection feature:
- Navigate to the Admin tab.
- Under the Employee Application Configuration section, click the General Configuration hyperlink.
- On the Global Setup tab, view the Auto reject requests awaiting organization information feature.
- Check the box to enable the feature.
- Click the Save button.
STEP 2: CONFIGURE THE NUMBER OF DAYS UNTIL AUTO REJECTION
Once the box is checked, configure the expiration date for the pending match. This number will determine the length of time the system will wait before rejecting a request.
You can choose from preset time frames of 30, 60, 90, or 180 days. Alternatively, you can set a custom timeframe of up to 365 days (see Figure 1).
Note: If you enter invalid values or special characters when setting a custom timeframe, the system will not allow you to save those entries.
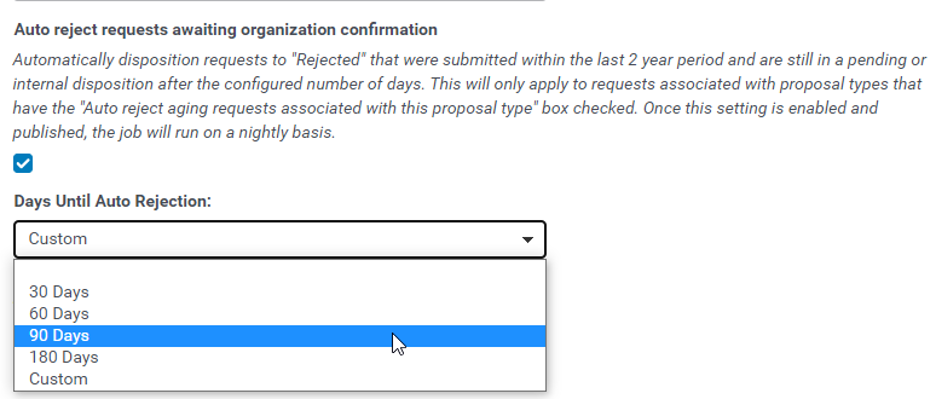
Figure 1 Configurable Automatic Rejection Threshold
STEP 3: CONFIGURE ELIGIBLE PROPOSAL TYPES
Only requests associated with designated proposal types will be automatically rejected. To configure eligible proposal types, follow these steps:
- Navigate to the Admin tab.
- Under the Employee Application Configuration section, click the View Proposal Types hyperlink.
- In the Employee Giving Proposal Types column, click the hyperlink for the proposal type you want to configure.
- View the Organization Setup tab in the left-side navigation menu, click the Confirmation Settings hyperlink.
- Check the box to designate the proposal type for auto rejection.
- Click the Save button. Publish the changes to enable them in the Production environment.
- Save the changes and publish them.


