Overview
The Payment Batch functionality allows an Administrator to process payments for check cutting in an external Accounts Payable system, check printing through CyberGrants or transmitting payments to an organization via ACH. Payment batching should be performed in the Production environment.
 Note
Note
This payment batch functionality should only be used on accounts that are using a client owned or managed accounts under our legacy service model for payments. Please contact your client manager if you are unsure whether or not this applies to your account.
Check out this video to learn about payment batching.
Instructions
To create a payment batch select at least one of the following filters:
- Click the “Payment Batch” link in the “Payments” subsection to display a list of payments ready to be processed. By default, all payment types and proposal types are selected, displaying all possible payments to batch.
- Select the Payment Type(s) from the list box,
- Select a Proposal Type for requests that are ready to be batched
- Select Payee Country(s)
- Select Currency Code(s)
- Requested Payment Date
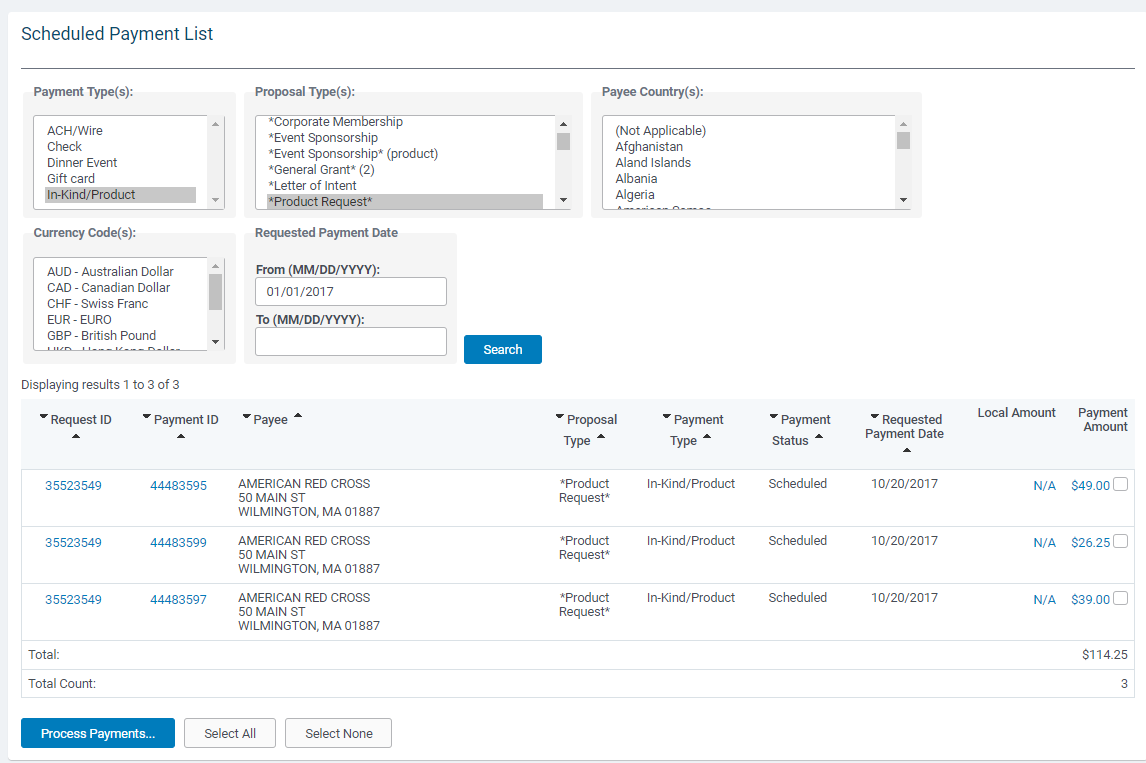
TIP: Click the “Payment Amount” link to review a specific payment.
The payments listed meet the following criteria:
- Payment Status is "Scheduled."
- Application has an "Approved" status.
- Requested Check Date is the current date or earlier.
- Payee is specified for the organization/request.
Select the payments to be batched
- Click the “Select All” link at the bottom to select all payments in the list or
- Click the checkbox to the right of the payment amount to specify the payments to include in the batch.
- Click the “Select None” link to de-select all selected payments.
- Click "Process Payments" button
- A screen to review the pending batch displays all records. Scroll to the bottom and click the Select All button, and then press the Process Payments button. You will see the ‘Payment Batch Number’ on the next screen.
Next Steps:
Client Funds the Account
Client will fund the account the appropriate money for the payouts and notify CyberGrants after the account is funded. The client should fund the account for the total dollar amount for the batches that were just created.
Notify POD
Once the account is funded send an email to the POD to let them know you completed your last payout process step include the batch number the payment type and the total dollars amount.
Payout
Once CyberGrants receives authorization to make payments, CyberGrants will make the payments to the organizations via CHECK and ACH via the following processes:
Positive Pay File (checks)
- Once checks are generated CyberGrants will send the positive pay file to the banks. Checks are not released until the client gives approval.
- Once positive pay file clears the bank, client will give CyberGrants the OK to mail the checks.
- When positive pay backfeed is received we will update the check cash date on the payment representing the date the organization cashed the check with the bank.
ACH File
- CyberGrants sends ACH file to the bank. Then the bank releases the payments.
- If there are return items from the ACH the organization will need to be contacted for the correct banking information


