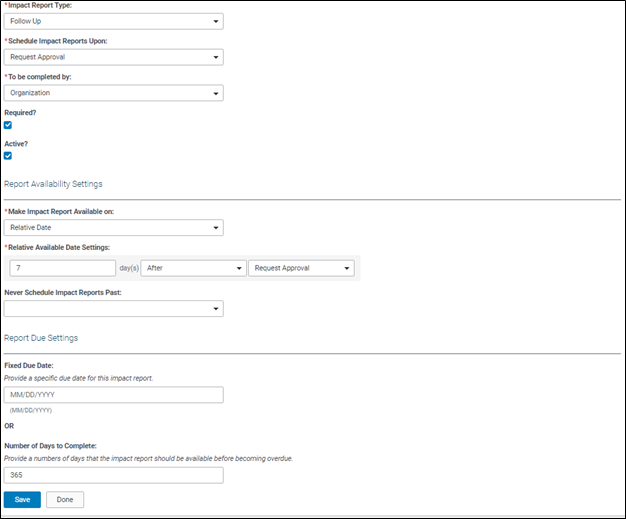
General Information
Administrators can create one or more applications with different sets of questions to reflect the multiple funding programs of the Grantmaker. Each of these different applications are referred to as a "Proposal Type."
To develop a proposal type:
1) Click the “View Proposal Types” link under Proposal Types in the Application Configuration menu.
2) Click the “New” button.
3) Enter a proposal type name and description.
4) Click the “Active” checkbox to activate the proposal type.
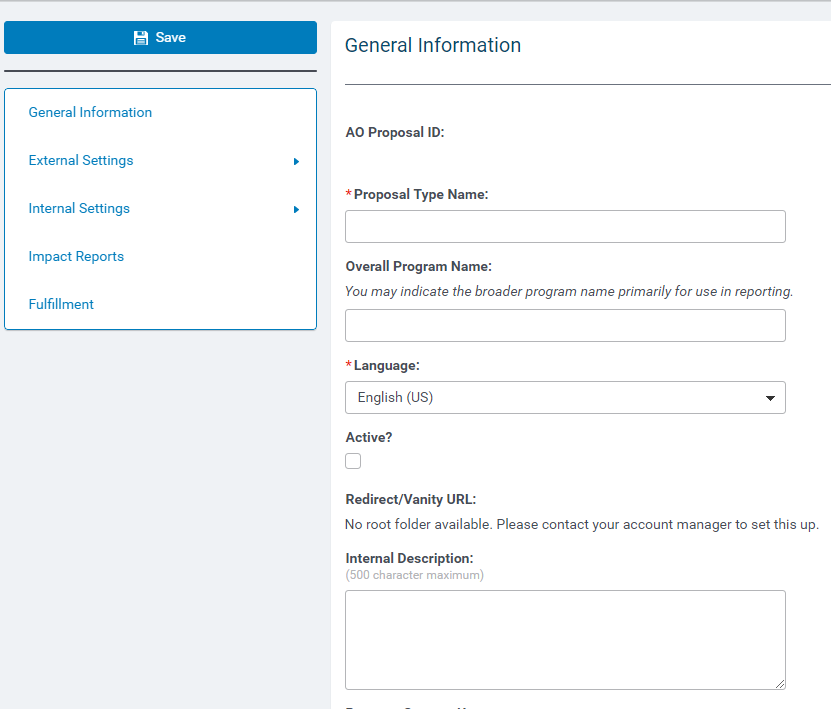
External Settings
Application Availability
1) Indicate whether unsolicited proposals are accepted for this proposal type. Click the “Allow Unsolicited Requests?” if they are allowed. If they are not allowed, applicants are required to enter an invitation code to apply. (Refer to “Invitations” in the System Maintenance subsection.)
2) Enter Start and End dates/times if they are appropriate to the proposal type.
NOTE: Start/End dates trump invitation codes. Once the End date is reached, the application is closed to solicited AND unsolicited requests, and invitation codes cannot override the deadline.
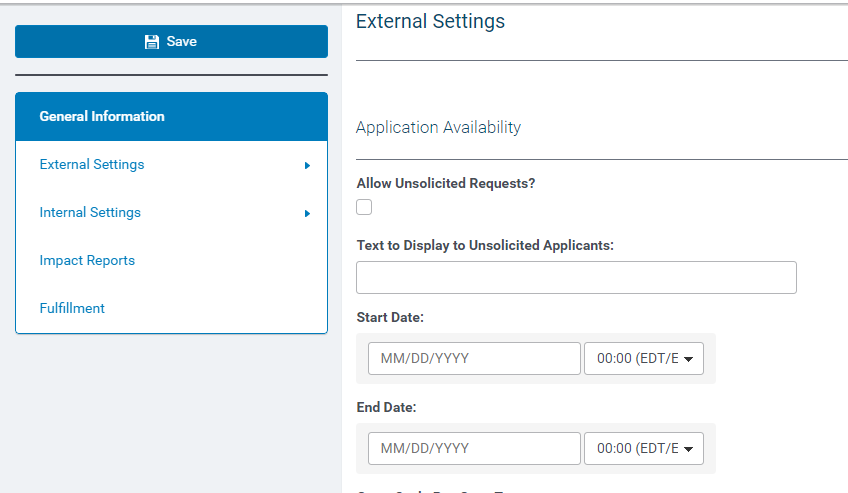
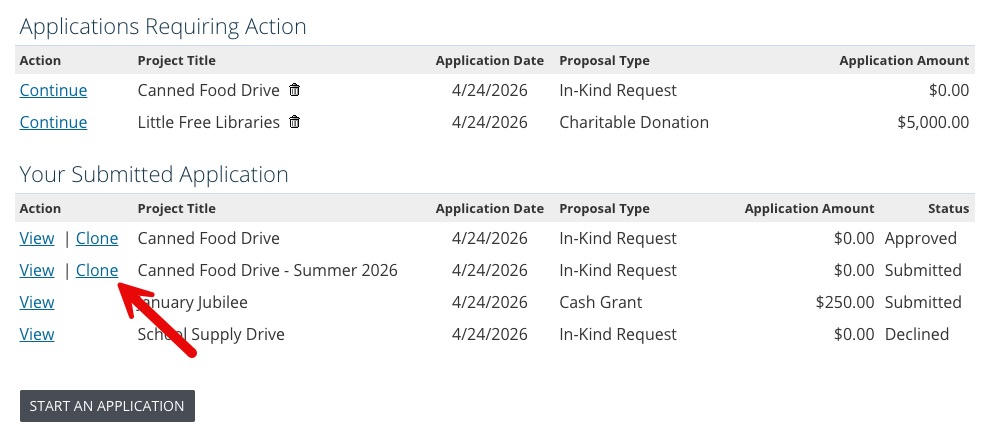
3) Configure whether eligible grantseekers can clone previously submitted requests.
Administrators can allow returning, eligible grantseekers to clone their previously submitted requests. This accelerates the application process by pre-populating request fields with information from prior submissions.
- Check "Allow grantseekers to clone eligible requests" to enable this feature. This checkbox is unchecked by default on new and existing proposal types.
- If enabled, a second checkbox appears: "Include file attachments when cloning requests"
- If checked, file attachments from the original request will be copied to the cloned request
- If unchecked, file attachments will NOT be copied; grantseekers must upload files manually. This is useful if you want grantseekers to verify that file attachments have been updated from the previous submission.
- This checkbox is also unchecked by default when cloning is first enabled
What gets cloned: When a grantseeker clones a request, only external fields are copied to the new request. Internal fields are NOT cloned.
Important: Cloning eligibility is also affected by:
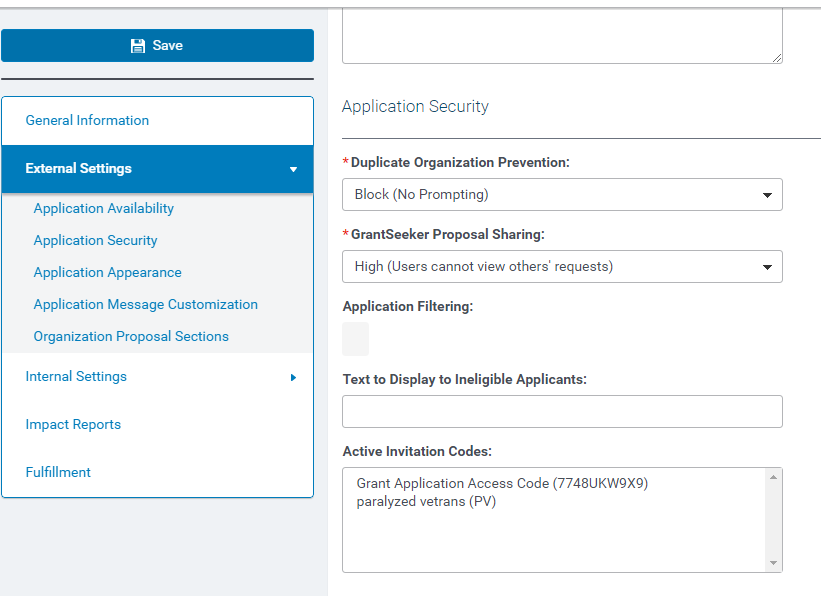
- GrantSeeker Proposal Sharing setting (see Application Security section below): Only grantseekers with Low or Medium sharing levels can clone. A high sharing level (users cannot view others' requests) prevents cloning.
- Request status: Only submitted, non-rejected requests can be cloned
- Grantseeker eligibility: The grantseeker must currently be eligible for the proposal type at the time of cloning
- Fields and configured values: Only fields and list values that are currently configured on the proposal type are cloned. Values that were part of the application at the time the original request was created, but have since been removed will not copy over.
- Invitation codes: Invitation codes that were attached to the original request are not cloned. The cloned request will only receive an invitation code if the grantseeker is logged in with one at the time they create the cloned request. Invitation codes that give access to apply for a grant outside the normal eligibility conditions do not expose the cloning option; in that case, the grantseeker must still start an application from scratch.
Application Security
1) Determine the level of preventing duplicate organizations.
- Block No Prompting
- High Prompt User with Joining Options ONLY
- Medium Prompt User with Joining Options + Create New
- Low Allow Duplicate Creation
|
2) Determine the nonprofit security level:
- High ensures that an online applicant has access to only the grants the applicant personally created.
- Medium allows an online applicant to edit only the requests that they personally entered and view other requests associated with their organization.
- Low allows an online applicant to view and edit all requests tied to their organization.
Important Notes on Cloning:
- The GrantSeeker Proposal Sharing level affects whether grantseekers can clone requests:
- High = NO cloning (users cannot view others' requests, so no clone option appears)
- Medium = Cloning allowed (users can view others' requests)
- Low = Cloning allowed (users can edit others' requests)
- A cloned request does not preserve any relationship to the request it was cloned from; it is merely a mechanism to start a new application with request fields pre-filled. There is no indication in either Apply Online or Admin that a request was cloned from a prior one.
- This functionality does not change anything about the existing option within Internal Admin to clone requests.
NOTE: Only an unsubmitted request or a request returned to the applicant for revision is editable.
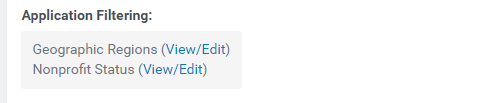
3) Application filtering can determine a nonprofit organization’s eligibility for each proposal type and limit the online applications accepted by the proposal type using the following filters:
- Geographic Regions
- Nonprofit Status
- IRS Activity Code
Geographic Regions
“Geographic Regions” filters applications based on the locale of the applicant. The filter has four levels – Country, State, County, and City.
1) Click the “(View/Edit)” link to the right of the Geographic Regions heading under the Application Filtering section.
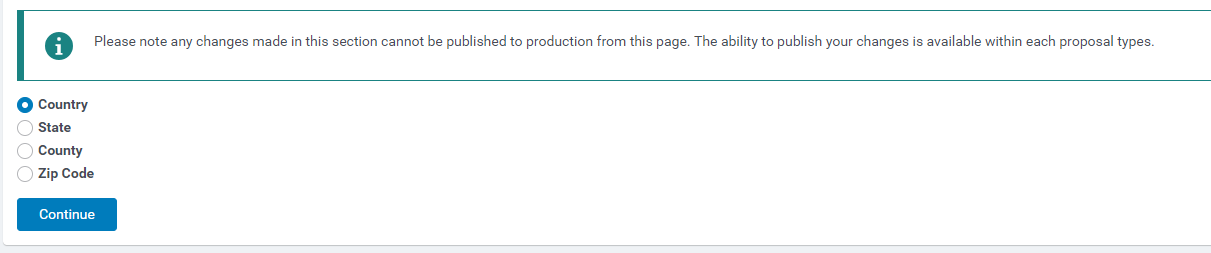
2) Select the lowest region level to filter on (Country, State, County, or Zip Code) and click continue.
1) Select the appropriate country/countries, state/states, county/counties, or zip code/zip codes depending on the region level you chose.
2) Click the “Save” button.
NOTE: The user may click the “Return” button to select a different Geographic Regions level.
Nonprofit Status
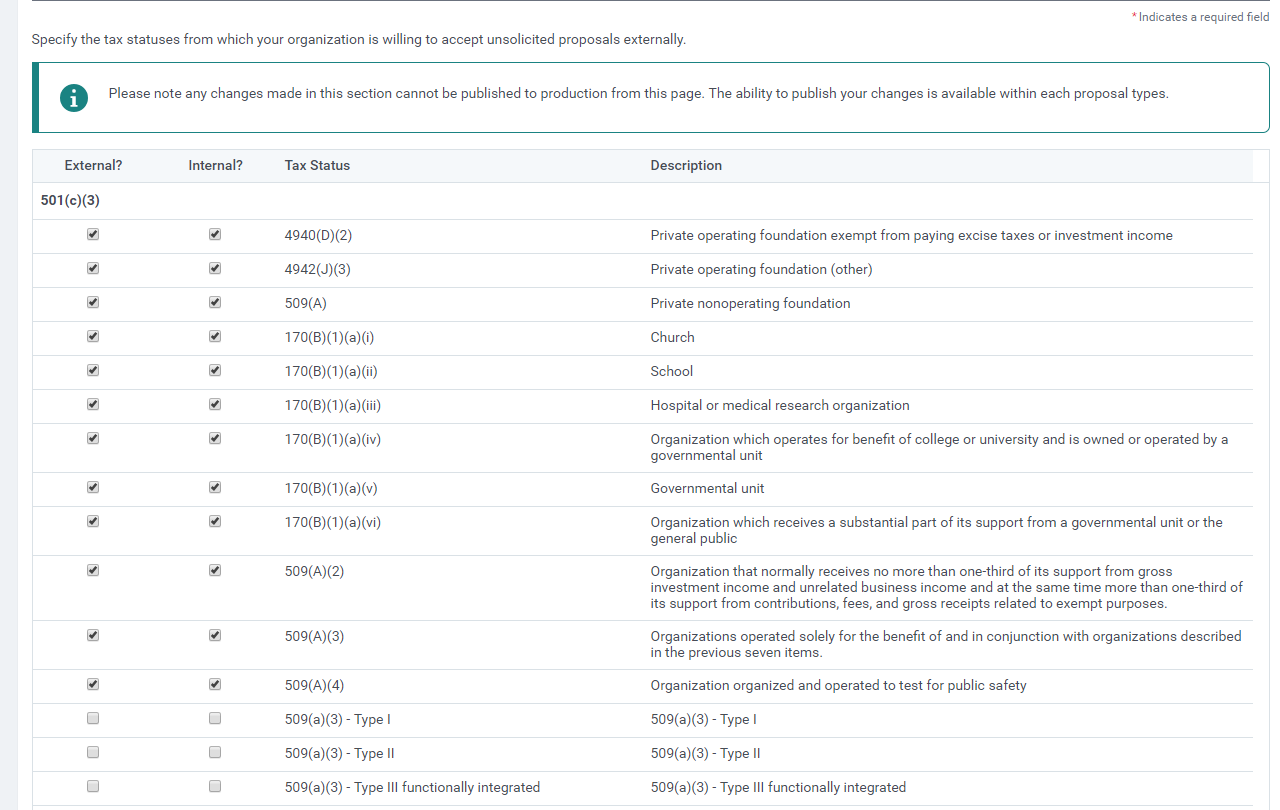
“Nonprofit Status” filters on IRS tax statuses and NCES IDs. There are twenty tax status options, each having the following checkboxes:
- “Internal” (CyberGrants user) indicates that the GrantMaker is willing to accept proposals internally created by a CyberGrants user for an organization with this tax status.
- “External” (online applicant) indicates that the GrantMaker is willing to accept unsolicited proposals externally created by an online applicant from an organization with this tax status.
NOTE: Please see Appendix D for the Nonprofit Status options in the CyberGrants system. The Administrator must select at least one status if the GrantMaker accepts unsolicited (not by Invitation) proposals.
To filter by nonprofit status:
1) Click the “(View/Edit)” link to the right of the “Nonprofit Status” heading under the Application Security section.
2) Select the nonprofit statuses to limit the applications by placing a checkmark in the Internal (CyberGrants user) or External (applicant) user.
3) Click the “Save” button.
3) Activate any invitation codes that apply to this proposal type.
NOTE: If you have not setup any invitation codes within CyberGrants this option will not appear within the proposal.
Application Appearance
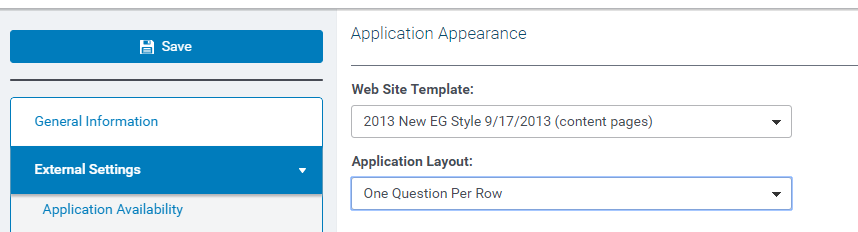
The external appearance of an application is determined by the following two fields:
- “Web Site Template” is a dropdown list with all active, external styles
- “Application Layout” is a dropdown list with two options for the layout of the questions on the application
- “One Question Per Row” displays one question per row with instructions below the question.
- “Two Question Max Per Row” displays two questions per row with instructions displayed to the right of the questions
4) Select the “Web Site Template” if the default template is not appropriate.
5) Select the “Application Layout”
6) Click the “Save” button located at the very bottom of this screen.
The following are optional functions an Administrator may choose to utilize:
- To configure the text of the e-mail events for a certain proposal type, click the “(View/Edit)” link under E-mail Event Configuration while on the proposal type screen.
- To configure the text in the Introduction, Review, Submission, or Previously Submitted screens, enter/modify the text in the corresponding paragraph boxes. Click the “Preview Text” link to view the text.
Application Message Customization
NOTE: Please be careful when editing text in the Welcome and Submission screens. These contain HTML code and URLs that may become invalid. For tips on using HTML, visit How do I use Basic HTML? Please contact your Client Manager if you need assistance with editing these text fields.
- To return the default text in the Introduction, Review, Submission, or Previously Submitted screens, erase the configured text then click the “Save” button. The default text is substituted for the blank paragraph box(es).
Login Instructions
Registration Header and Instructions
Registration Header and Instructions (for existing organizations)
Organization Header and Instructions
Quick Add Organization Header and Instructions
Password Reset Instructions
Password Change Instructions
Organization Selection Header Text and Instructions
Start New Application Link Text
Start a New Application
Proposal Type Introduction
Proposal Type Review Screen Header Text and Instructions
Proposal Type Submission Screen Header Text and Instructions
Proposal Type Previously Submitted Screen Header Text and Instructions
Proposal Deletion Header and Instructions
Show Proposal Type?
External Proposal Type Name
Support Link Text
Show Status?
External Status Text:Submitted
Pending Status Text:Under Review
Pending Approval Status Text:Under Review
Rejected Status Text:Declined
Approved Status Text: Approved
Canceled Status Text: Canceled
Conditional Logic
Field conditions allow you to display or hide certain fields within a proposal type based on another field. Using this functionality, you can prevent applicants from seeing/answering questions that do not apply to them.
Within the Advanced section of a proposal type find the field you want to be hidden/displayed and click the “Create” link under the “Conditions?" column.
Create your logic by choosing the fields and the rules:
- Conditional behavior (Display and require OR hide)
- Field on which the condition is based
- Comparison Operator (If certain field is…)
- Meets a certain criteria (value, quantity, blank, etc.)
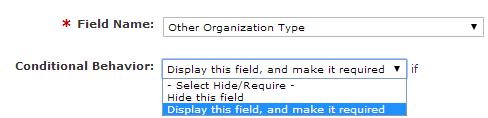
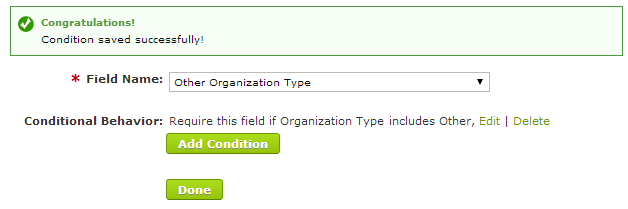
Your new rule is set to display and require the “Other Organization Type” field if the Organization Type field includes the “Other” list value:
It is generally the case that if you are creating a DISPLAY rule you need an opposite HIDE rule as well. In order to correctly configure this, add a new condtion. Everything should stay the same EXCEPT FOR the behavior and the comparison operator :
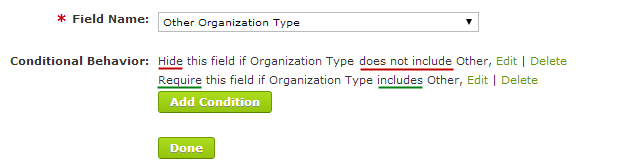
The HIDE rule should be configured this way if you want the system to hide the field if the Organization Type field is blank because it has not yet been selected.
Once you have saved your conditions, the external grantseeker will see a confirmation message.
- If “Organization Type” has a value of “Other”, the Other Organization Type field will display and be required.
The system automatically validates dependent list values when the base field is updated, ensuring only current, supported values can be selected. The user must update the dependent field to a valid, configured value if an unsupported value is detected.
- The system will generate an alert for dependent values set to null due to base field changes.
Request-Level Dates
Administrators have the option to enable due date and committee date fields to help manage the review process. Due dates communicate when decisions should be made, while committee dates organize requests for committee review. Click here to view detailed instructions on configuring request-level dates.
Organization Proposal Sections
Within CyberGrants, a grant application consists of sections. “Proposal Sections” allow an Administrator to construct and configure the different sections of the online application.
Each proposal type defaults to a blank Contact, Organization, and Request section for the External Proposal 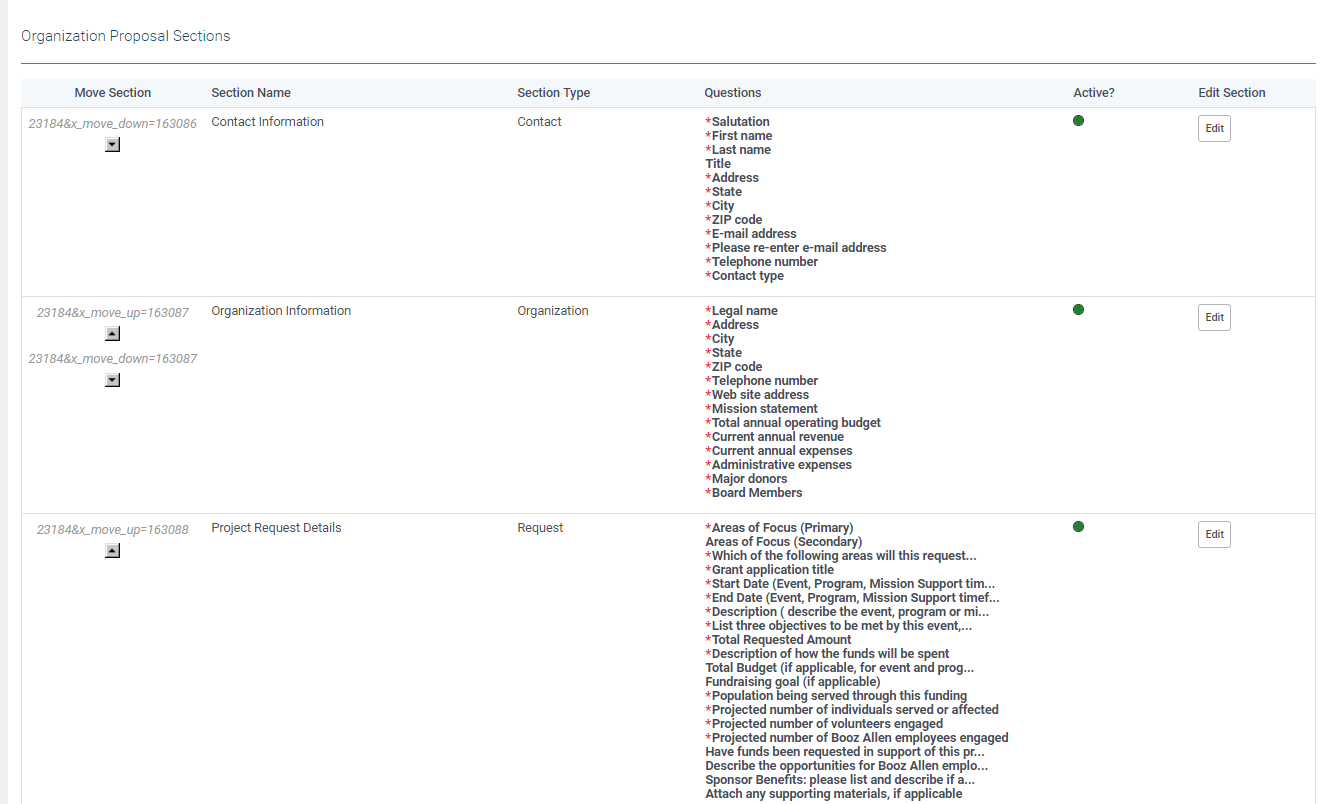 Sections (sections visible to the nonprofit) as well as Request, Payee, Payment and Approval sections for the Internal Proposal Sections (sections visible only to the CyberGrants user).
To add questions to these default sections:
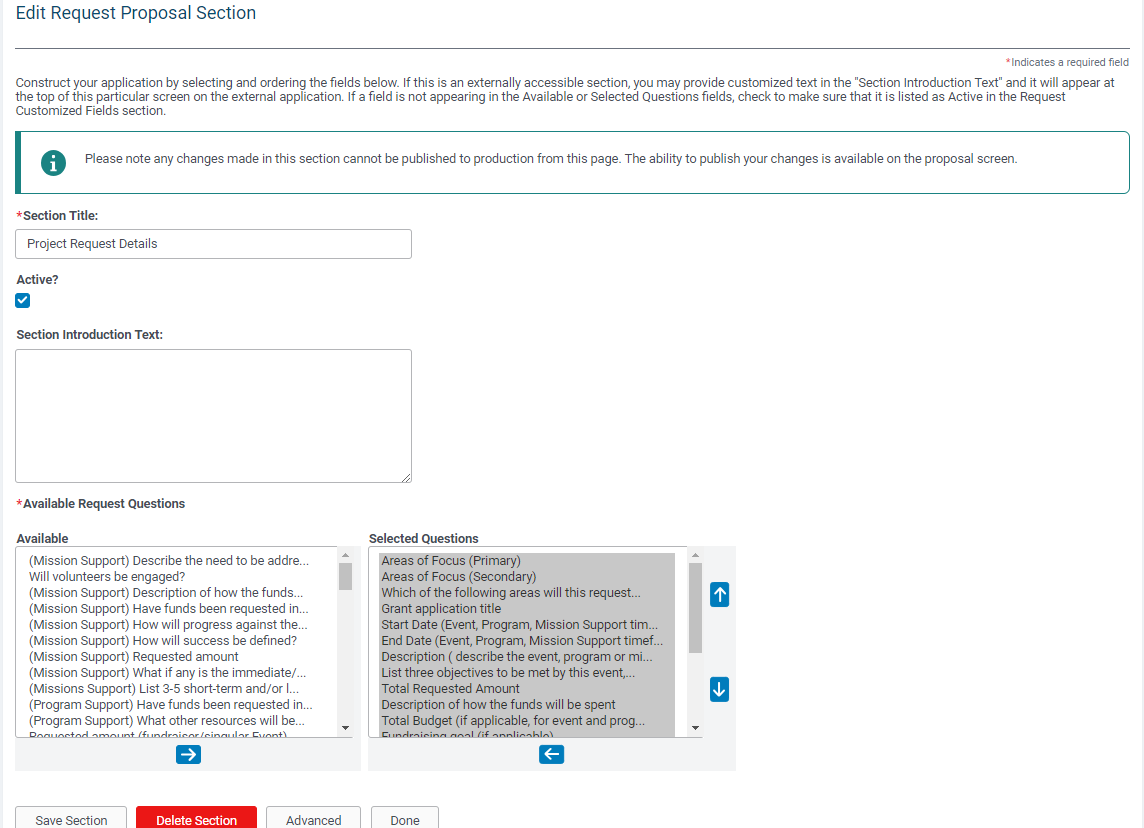
1) Click the “Edit” button in the “Edit Section” column to the right of the appropriate section.
2) Modify a Section Title
3) Designate the section as “Active”.
4) Enter Introduction Section Text if needed
5) Move the appropriate fields from the “Available” box on the left to the “Selected Questions” box on the right using the “Add” arrow.
6) Arrange the questions in the proper order using the up and down arrows beside the “Selected Questions” box.
7) Click the “Save” button to save any changes made to the proposal section.
From the main Proposal Type screen, an Administrator can determine the following:
- the order of the sections
- the Section Name, the Section Type, and the questions selected for each section
- if a question is required (shown in red), and
- if a section is active ().
An Administrator can opt to:
- Rearrange the order in which the sections display to the online applicant. Use the arrows beneath the “Move Section” column.
- Add a new section. Click the “Add Contact Section”, “Add Organization Section” or “Add Request Section” button. Adding a section allows an Administrator to organize questions and keep each section concise. For example, many GrantMakers add a “Request Demographics” section to include 4 or 5 questions specifically about the population served by a request.
- Create a second, similar Proposal Type. Click the “Clone Proposal Type” button and then modify the cloned proposal type.
NOTE: The cloned Proposal Type name defaults to the same name as the proposal that was cloned followed by a number. All features of the original Proposal Type are transferred to the cloned version, including the screen instructions, application filters, proposal sections, and impact report parameters. - Delete a section; click the “Delete Section” button at the bottom of the Proposal Section screen.
Advanced
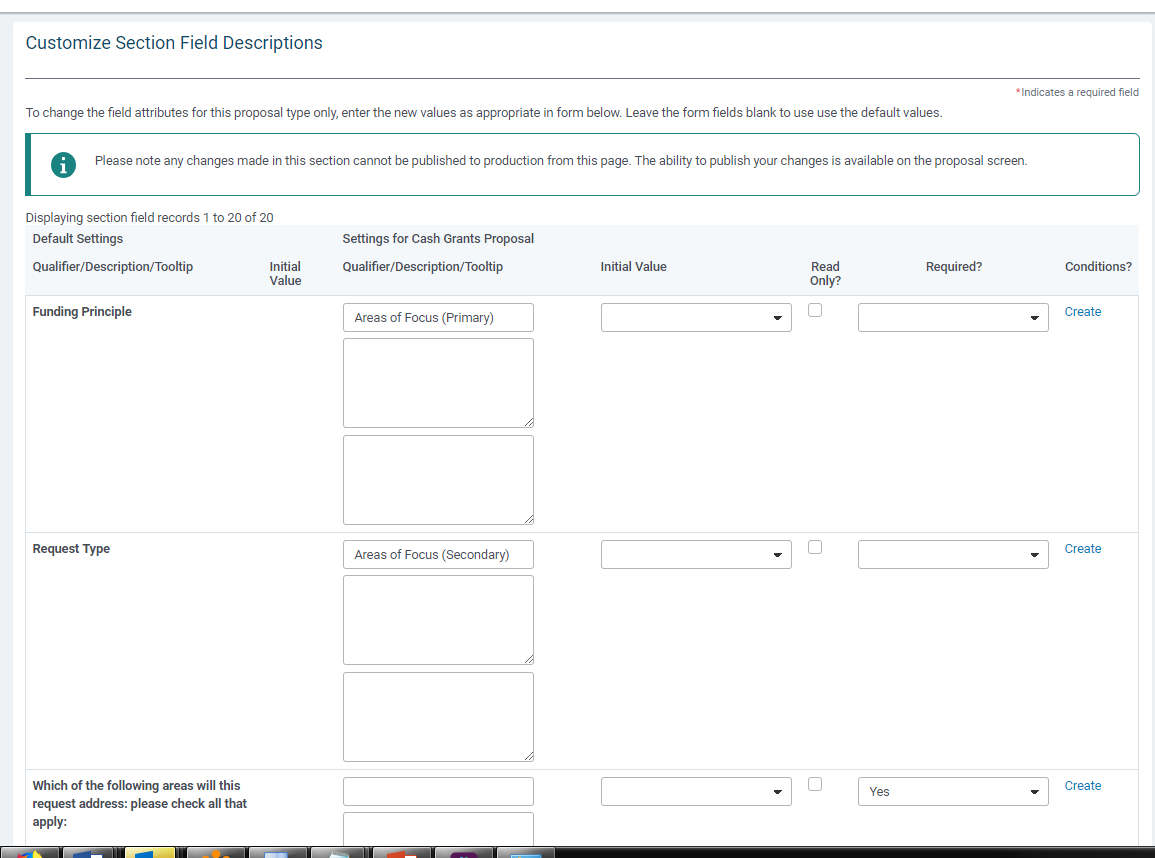
The “Advanced” button allows an Administrator to modify the default field name and description created in Data Fields, and configure them for that specific proposal type.
NOTE: Although the data field name displays on the screen, the standard field name displays as a column heading in a standard or Ad Hoc report.
To access and use “Advanced”:
1) Click the “Proposal Types” link.
2) Select a proposal type.
3) Click the “Edit” button in the proposal section in which the field resides.
4) Click on the “Advanced” button. The screen shows two columns:
- “Default Settings” has the default qualifier (field name),default description underneath and default tooltip underneath the description in read-only format
- “Settings for the proposal type” has the qualifier (field name), field description underneath and the field tooltip underneath that, which is where you would configure them for that specific proposal type.
5) Enter the qualifier and/or description and tooltip.
Click the “Save” button to save the changes.
Internal Settings
Internal Security
Limit Visibility to the selected Internal User Role(s):
Internal Appearance
Approval Step Visibility for internal users not involved with request: determines whether approval comments and decisions will display internally to CyberGrants users.
- Hide all approval comments and decisions
- Show all approval comments and decisions only upon final decision
- Show all approval comments and decisions
Internal Proposal Sections
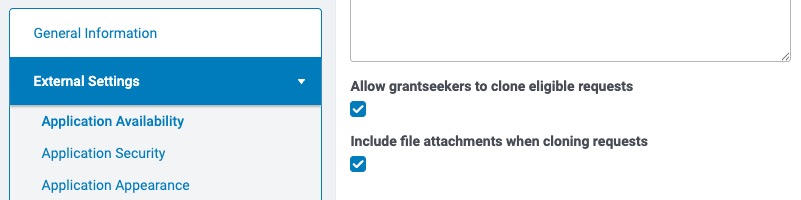
Impact Reports
The impact report section allows an Administrator to associate one or more impact report with a proposal type. However, before an Administrator can link an impact report, a user must create the impact report and its associated fields. For a description of how to create an impact report and its associated fields see the next subsection titled “Impact Report Types”.
Existing scheduled impact reports will appear at the bottom of your proposal type along with a button to create a new schedule:

After creating an impact report, use the following steps to associate an Impact Report with a proposal type:
- Go to the “Impact Reports” section in the proposal and click the “New Impact Report Schedule” button.
- Select the appropriate impact report from the “Impact Report Type” dropdown list.
- Select the appropriate “Schedule Impact Reports Upon” from the dropdown list.
- Select who should complete the report from the “To Be Completed By” dropdown: Administration (CyberGrants Admin user) or Organization (nonprofit organization).
- Check “Required?” if the person assigned in “To Be Completed By” must complete the impact report.
- Check “Active?” to make the impact report section active.
- Select whether the Impact Report should be available on a “Relative Date” or a “Fixed Date”
- Select what the date is in relation to (approval date, project start date, grant paid date, etc.)
- Enter either a specific number of days after approval or enter a fixed date on which the impact report becomes available.
- Enter either a specific number of days for completion after the impact report is available or enter a fixed date on which the impact report is due.
- Click the “Save” button at the bottom of the proposal type screen.