Configuring Workflow Statuses and Sub-Statuses helps you create a workflow that reflects your organization’s operational processes and provides clear, actionable visibility for all users. This setup defines how requests move through each stage, ensures the right level of detail appears for each proposal type, and supports consistent reporting across your programs.
Using Workflow Statuses eliminates key limitations such as:
- Fixed, unconfigurable dispositions.
- The need to open individual requests to view approval progress.
- Limited reporting visibility into where requests stand within a workflow.
The following steps guide you through defining, publishing, and linking workflow statuses and (optionally) sub-statuses.
Step 1: Create Workflow Statuses on the Request
- Navigate to Admin → Application Configuration → Data Fields → Request.
- Search for and open the Request Workflow Status field.
- On the Edit Request Custom Field page, add or update your list of workflow statuses.
- Each status represents a primary step in your process, such as Submitted, In Review, Approved, or Closed.
- Click Save once your list values are defined, and publish your changes before proceeding.
These statuses form the base workflow tracking for all requests. You can use them alone, or proceed through the following steps to extend them with sub-statuses for greater detail.
Step 2: Create a Workflow Sub-Status Set (optional)
- Go to Admin → Application Configuration → Workflow Events and Status. \
- Below the Workflow Sub-Status Sets list, click Create New Event Set (or select an existing one to revise its settings).
- Enter a Set Name and Set Description that describe the purpose or program area—for example, Compassionate Care Fulfillment Process.
- Add sub-statuses (or triggering events) that reflect detailed steps in your workflow (for example, Pending Committee Review or Shipment Scheduled).
- Save your sub-status set.
- When finished, publish the configuration to make the set available for assignment.
Step 3: Link a Workflow Sub-Status Set to a Proposal Type
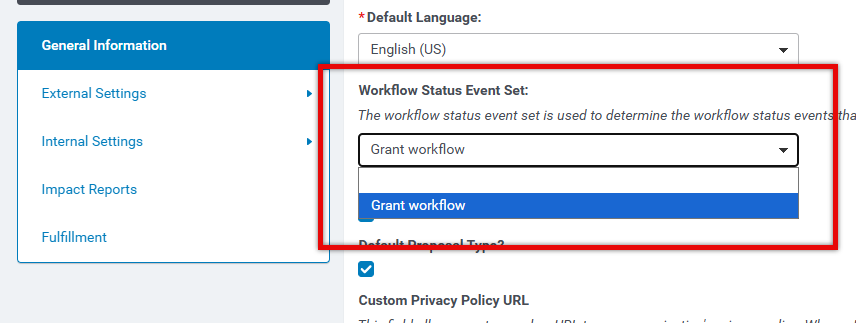
- Go to Admin → Application Configuration → Proposal Types.
- Select the proposal type you want to configure.
- In the Workflow Sub-Status Set field, choose the set that best represents this proposal type’s process.
- Save and publish your changes.
- Return to Workflow Events and Status to confirm the proposal type now appears under that sub-status set.
Step 4: Consider Publish Dependencies
When publishing updates from Sandbox to Production, ensure any linked Workflow Sub-Status Event Sets are published first.
If a proposal type is linked to an unpublished set, you may see this message:
“Your publication on <date/time> was unsuccessful because Workflow Status Event Set #<number> requires migration to production before this publication can proceed.”
- Publish the sub-status event set before re-publishing the proposal type, or
- Remove the unpublished sub-status from the event set, or
- Temporarily remove the event-set association before publishing.
Step 5: Verify and Maintain Configuration
- Confirm the Workflow Status field appears in the Information panel of a request.
- Test workflow events such as External Submission or Change in Disposition to ensure statuses update correctly.
- Use ad hoc reporting to verify visibility and accuracy.
- Update Workflow Status and Sub-Status configurations when adding new approval types or proposal types.
What else do you need help with?
Not what you're looking for? Navigate to Understanding Workflow Statuses and Sub-Statuses


