Administrators can manage donors through the User Management Module on the Admin tab:
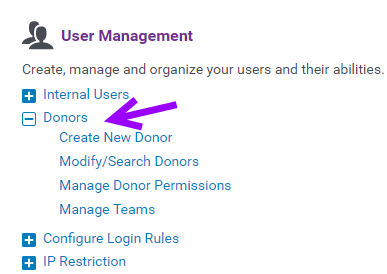
Create New Donor
- Select "Create New Donor" and enter all contact info for the new donor. Donor ID and Donor Code are required.
- The Donor ID must be a unique value. The Donor Code must also be unique and may match the Donor ID, if desired.
- Enter a password you will share with the new user, and initiate "Force Password Change Upon Next Login?" so that it can be reset.
- Yes – Donor will have to change their password when they next log in.
- No – User will not have to change their password when they next log in.
- Enter the donor's first name and last name.
- Active?: Select to make the Donor live for use.
- Checked/Active – Donor can log in and can register transactions
- Unchecked/Inactive – Donor cannot log in and cannot register transactions
- Note: If a donor is left out of an HR Feed update, they will automatically be set to Inactive (unless flagged 'Exempt from HR Feed').
- Exempt from HR Feed? Note: Use the “Exempt from HR Feed?” setting if you are creating a donor profile for testing and do not want the profile to be overwritten by future HR Feed imports.
- Checked – This donor will not be updated by the HR Feed.
- Unchecked – This donor will be updated upon receipt of HR Feed.
- Enter the first and last name of the donor again, along with their email address.
- Click "Save."
Note: Fields like Donor Company and Employee Type can only be populated using values that were previously imported through the HR feed or manually added by CyberGrants support.
Modify/Search Donor
- Search: Preview displays Employee Name, Phone/Fax/Email, Donor Role, Donor Code/Donor ID, and active. Search can be executed on these fields and/or keywords.
- Modify: Donor Name.
- All contact information can be modified except for the User ID.
- Force Password Change Upon Next Login?
- Yes – User will have to change their password when they next login.
- No – User will not have to change their password when they next login.
Manager Donor Permissions
Create Role:
- Role Name: Create Role Name (Example: Event Manager, Event Volunteer).
- Role Description: Short explanation of User Role
- Active?: Select to make the User Role available for use.
- User Permission: Selecting permissions by checking the box.
Permissions Available for Donors
General
Ability to configure impersonation settings for donors
Ability to impersonate donors
Volunteer Connection
Ability to broadcast e-mails to donors
Ability to cancel event
Ability to clone an event
Ability to log hours for event participants
Ability to manage enrollment roster
Ability to modify volunteer opportunity post-publishing
Ability to share event management
Ability to view dietary preferences of other employees
Ability to view donor codes of other employees
Ability to view e-mail addresses of other employees
Ability to view T-shirt sizes of other employees
Ability to view telephone numbers of other employees
Manage Teams
- Configure employee teams' and goals.
- Select a team name to view and edit their goals.
- All employee assignment is managed through HR Feed.
What do you need help with?
Additional Resources
Not what you're looking for? Navigate to CyberGrants User Management Overview


