Adding result columns allows admin users to set preferences for their search results by displaying specific field values from records search results on the Main, Survey, Employee Giving, Nomination, Grantseeker, and Volunteer Events tabs. Admin users can customize their search results by adding specific fields to display the corresponding field values, removing search result columns, reordering the column layout, and setting default search preferences - providing a tailored search experience for users across different tabs.
Note: On the "Edit Default Search Result Settings," holding down the Shift key while clicking on the field names in one section will allow you to highlight and move multiple field names across to the other section at once.
Step 1: Select a Tab
Navigate to the Main, Surveys, Employee Giving, Nomination, or Volunteer Events tab within CyberGrants.
Step 2: Click on Settings
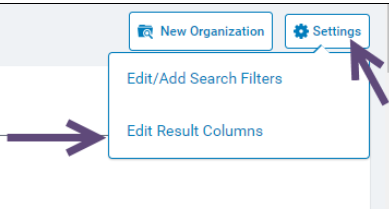
Click on the Settings in the top right corner of your screen.
Step 3: Access "Edit Result Columns" link
Click on the Edit Result Columns link.
Step 4: Add Columns
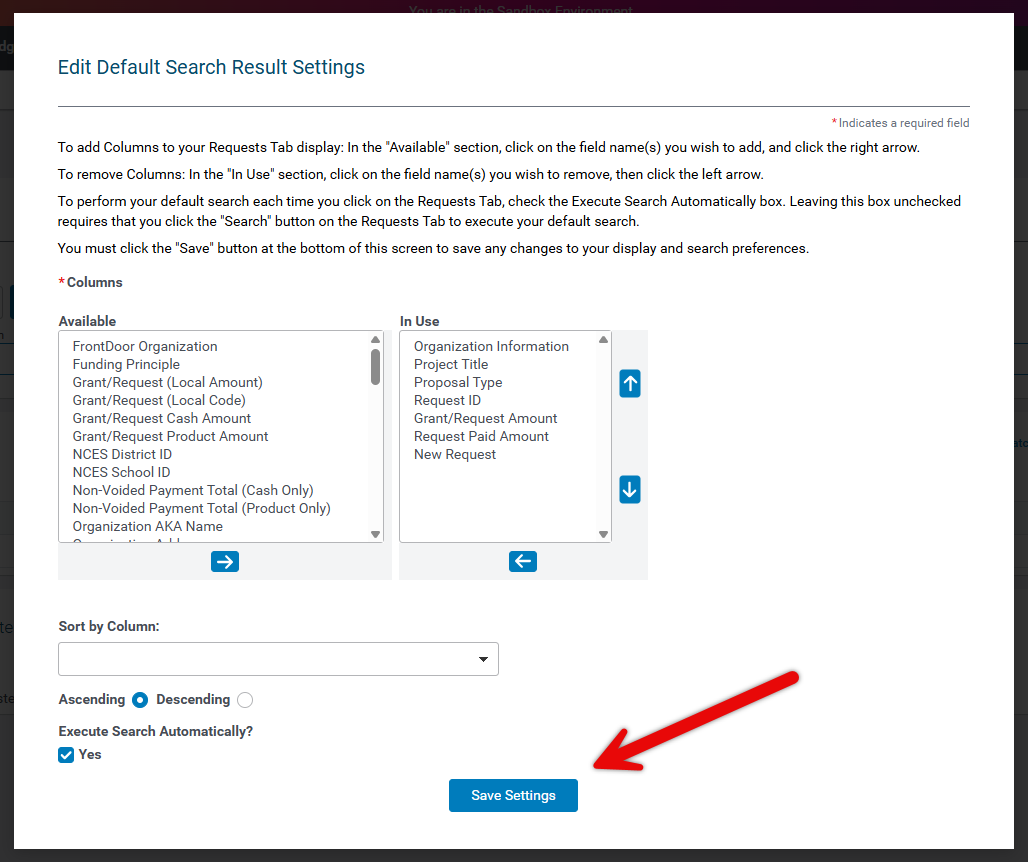
In the "Available" section, click on the field name(s) you wish to add. Click the right arrow button (->) to move the selected field(s) to the "In Use" section.
Step 5: Removing Columns
In the "In Use" section, click on the field name(s) you wish to remove.
Click the left arrow button (<-) to move the selected field(s) to the "Available" section.
Step 6: Reorder Columns
Use the up and down arrows to order the columns in your preferred sequence.
Step 7: Configure Default Sort
Configure how results are sorted by default:
- Sort by Column - Choose a field from your In Use columns to sort on.
- Adjust the sort order - Select Ascending or Descending using the radio buttons.
The list of fields available for Sort by Column is limited to the columns currently set to In Use.
Saving sort preferences applies to the specific search portlet you are editing (it does not change other search areas).
Step 8: Execute a Default Search
Check the "Execute Search Automatically?" box.
Leaving this box unchecked requires that you click the "Search" button on the Requests Tab to execute your default search.
Step 9: Save Preferences
Click on the "Save Settings" button to save your preferences.
Step 10: Example Search Results Display
Below is an example of the Main Tab Request Display.
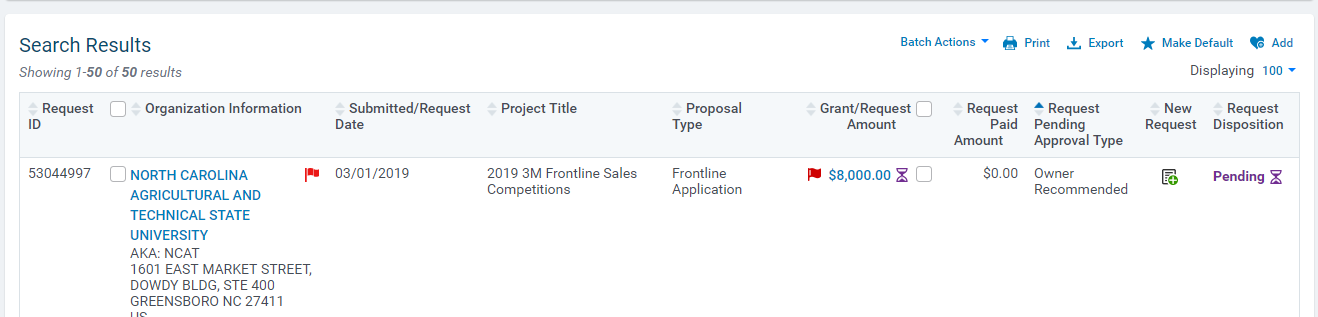
- Request ID: Unique CyberGrants ID number assigned to each request
- Organization Information: Name of Organization requesting funding
- Submitted/Request Date: The date the request was submitted (external requests); the date the request was submitted in the workflow (interal created requests)
- Project Title: The program name
- Proposal Type: The name of the request proposal (funding request type)
- Grant/Request Amount: Funding Amount Requested/Funding Amount Approved (depending on the request disposition).
- Grant/Request (Local Amount)
- Grant/Request (Local Code)
- Request Paid (Local Amount)
- Request Paid Amount (Local Code)
- Scheduled (Local Amount)
- Scheduled (Local Code)
- Request Paid Amount: Funding amount paid
- Request Pending Approval Type: Shows the current workflow step
- New Request: Click on “+” to create a new request for the Organization specified under Organization Information.
- Request Disposition:Updates as the request progresses through the approval workflow
- External– workflow has not started
- Pending- workflow has been started
- Approved-Request approved
- Rejected- Request rejected
What else do you need help with?
Not what you're looking for? Navigate to Understanding Search Configuration


