Approval Types are the steps of an approval rule where functionality and users are defined. Administrators can leverage Approval Types to tailor the approval workflow to their specific needs, ensuring an organized and efficient review process for a variety of requests.
Follow the instructions below to effectively configure Approval Types, enabling you to establish a consistent, transparent, and efficient review workflow for your program's approval processes.
Step 1: Access the Approval Type Configuration
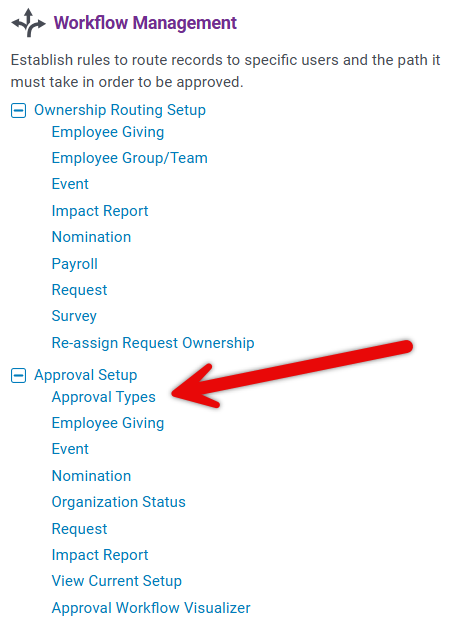
Enter the CyberGrants Sandbox environment and navigate to the Admin tab. Then locate the Workflow Management section. Under Approval Setup section, click on the Approval Types hyperlink to access the configuration page.
Step 2: Create a New Approval Type
On the Configure Approval Types page, click the "+ New Approval Type" button to begin setting up a new approval type.

Step 3: Define the Approval Type Details
- Enter a descriptive Approval Name that represents the group of users involved in this approval step (ie, management, senior management, program coordinator, etc.).
- Select the appropriate Type of Approval Action:
- Approve/Reject - user will be presented with these two options only. Approval will move the request to the next approval step or if the last step in the workflow. Reject will change the disposition status to rejected and the approval process is stopped.
- Step Definition - This step allows an internal reviewer to add specific users to an approval process within a specific request record.
- Recommend/Do Not Recommend - This is an opinion type asking the approver to make a recommendation. Regardless of the answer, the request will move to the next step and disposition status will remain at pending.
- Record input - Allows a reviewer to provide feedback on a request. Regardless of the answer, the request will move to the next step and disposition status will remain at pending.
- Choose the desired Visibility of Other Approval Steps:
- Show all approval steps - will allow the user to see all other steps that this request will need to take during its lifecycle.
- Hide previous approval steps until current approval type is complete - user won't be able to see other steps until the action they need to take on this request is complete.
- Hide all approval steps complete until final decision - the approval steps will be displayed upon decision on the final approval step
- Select the checkbox for Activate Approval Type to activate this type of approval.
s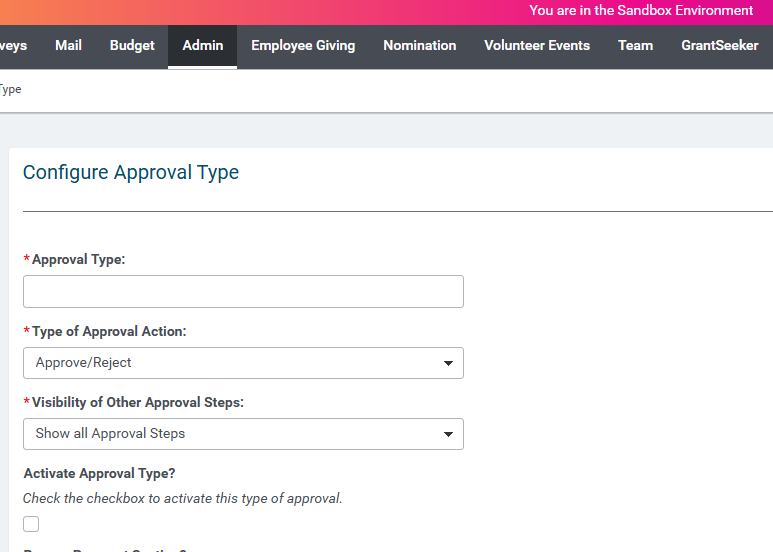
Step 4: Configure Additional Approval Type Settings
- Select the checkbox for Bypass Payment Section to allow this type of approval to be completed regardless of whether payments have been scheduled.
- Select the checkbox for Restrict to Owner to only allow the request owner to complete this approval type. Authorized owners must still be selected below.
- Select the checkbox for Require Grant Amount to require the presence of a grant amount before this approval type can be completed.
- Select the checkbox for Allow Edit of Recommended Cash Amount to allow the modification of the recommended cash amount for authorized users if this approval type is pending.
- Select the checkbox for Allow Edit of Recommended Product Amount to allow the modification of the recommended product amount for authorized users if this approval type is pending.
- Select the checkbox for Allow User to Save Approval Record in progress to allow the user to save approval information to return to later.
- Select the checkbox for Allow User to return to applicant to allow the user to return the application to the applicant at this point in the approval process.
- Select the checkbox for Allow User to return to previous reviewer to allow the user to revert the record to an earlier approval step.
- Select the checkbox for Allow User to recuse themself to allow the user to opt out of entering approval information.
- Select the checkbox for Allow User to Substitute another Reviewer to allow the user to substitute another approver with the same approval authority (applies to dynamic approvals only).
- Select the checkbox for Allow Owner to Add/Remove/Substitute a Reviewer to allow the owner to add/remove/substitute an approver with the same approval authority (applies to dynamic approvals only).
Step 5: Assign Authorized Users
Specify the Authorized User(s) who should be involved in the approval workflow. To select more than one user at a time, hold the CTRL key to add multiple users. It is very important to use the CTRL key when adding new users to an existing approval type so you do not remove any of the existing users.
- Inactive Users previously assigned as Authorized Users in Approval Types will remain visible, but Inactive Users cannot be assigned as Authorized Users once they've been made inactive.
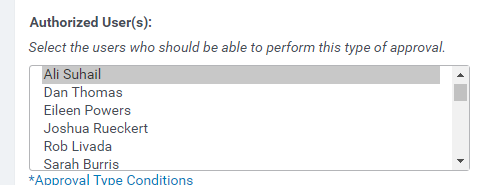
Add Approval Type Conditions - CLICK HERE to learn more!
Step 6: Update Approval Custom Field Display
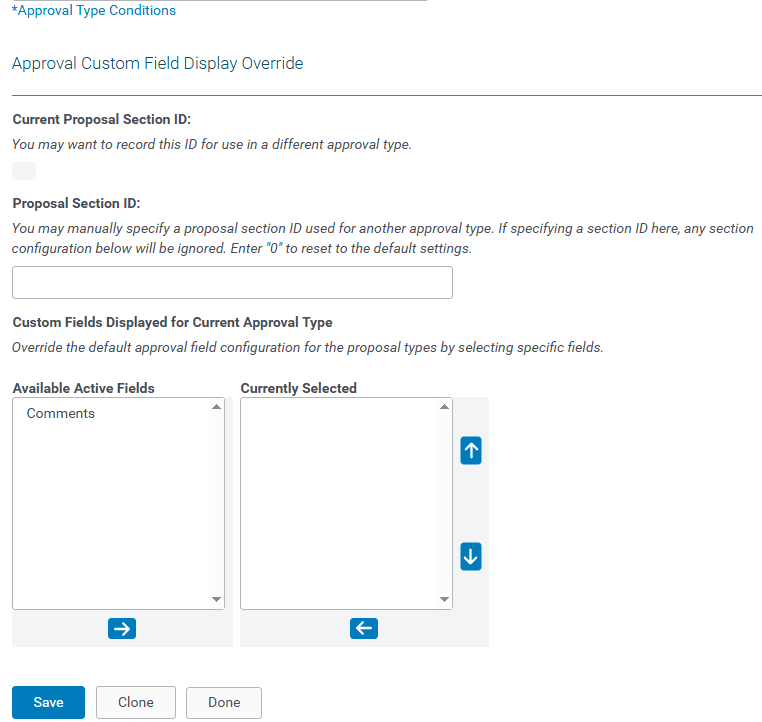
- Your Current Proposal Section ID will display here in a read-only fashion. Store this for your records and for future use.
- You may manually specify a Proposal Section ID used for another approval type. If specifying a section ID here, any section configuration below will be ignored. Enter "0" to reset to the default settings.
- When cloning an approval type, all attributes to that approval type are copied, and all fields selected within the approval type are carried over. This connection links several approval types together by a "section ID" that allows for changes made to one approval type to automatically update others that are linked.
- To perform a change without affecting the linked approval types, overwrite the section ID and reset to default settings by entering "0" in the open "proposal section id" text box. Then, save. This will break the connection for this approval type to the others to which it is linked.
- Custom Fields Displayed for Current Approval Type: Override the default approval field configuration for the proposal types by selecting specific fields.
- Select the field you want to add to this approval type.
- Use the right and left arrows to move the field.
Step 7: Save Changes
- When prepared, click "Save." Once Saved, you can customize the fields by selecting Advanced.
What else do you need help with?
Not what you're looking for? Navigate to Workflow Management Overview
Looking for training?
Explore this feature at your own pace - access training video content or watch a recorded webinar by clicking the link below.


